

GNS3 is a fantastic piece of software, it glues together different open source software and allows to emulate a network that includes Cisco routers (using real Cisco firmware), Cisco switches (using IOU, Cisco IOS on Unix), Cisco ASA and any other devices that can run on Qemu or Virtual Box emulator.
It also allows to connect the virtual network to the physical network, it is possible to access Internet in the emulated world and vice-versa. GNS3 is available on Windows, Mac OSX and on Linux, but it shines on Linux because, to use IOU, if you are not on Linux you need a Linux virtual machine running on VirtualBox.
But, because GNS3 glues together many moving parts, it can be troublesome to install everything and to have everything working seamlessly, for this reason i created a Docker image with everything installed, functioning and ready to be used on Linux (or in a Linux virtual machine running in Windows or Mac OSX).
Docker is another fantastic piece of software that, together with CoreOS and other cloud orchestration projects, like Google’s Kubernetes, is one of the building blocks for the incoming Cloud Revolution.
Docker containers (or Docker images) have similarities with virtual machines, but they run on same Linux kernel as the host, in a “chrooted” environment using Cgroups and namespace isolation to provide resource limitation (on cpu and or RAM usage) and isolation from the other host processes that are invisible inside the Docker container. The huge advantage of Docker containers against virtual machines is that they spin-up in milliseconds instead of tens of seconds and, because they share same kernel, don’t have to simulate the entire operating system, so they are much more efficient in terms of host resource usage. On the host you see the processe(s) running in a docker container as normal processes.
Another important feature of docker containers is that when they stop nothing is saved so that when they restart it is as if you are starting a new fresh image. If you need persistence you have to explicitly declare persistent volumes (folders) on the Dockerfile or you have to explicitly mount a folder, on the host, on a folder, in the docker image, when you start the docker image (-v option); in our case we explicitly mount the user’s entire home directory inside same directory in the docker image.
Building the Docker Container
I called the container gns3-large, because it is quite fat, it contains everything needed to build some software included in the image. The Docker file is available on the GitHub repository for the gns3-large project and contains instructions to
- build the image starting from the latest version of Ubuntu (14.04) officially available on the Docker Registry
- install software required by GNS3 and related software
- install Wireshark for packet capture and analysis from inside GNS3
- compile and install Dynamips (the simulation engine used by GNS3)
- install gns3-gui and gns3-server, the two components of GNS3
- compile and install VPCS, a sort of pc simulator that implements basic network testing functions like dhcp client, ping etc.
- compile and install iouyap, it is needed to interface the IOU executable with GNS3
- install QEMU, an emulator similar to VirtualBox
- install Gnome Connection Manager and the gcmconf script
- set
startup.shas the executable that runs when the container starts
The docker container can be built using the mybuild script or:
$ sudo docker build -t="digiampietro/gns3-large" .
or the image can be pulled from the Docker Registry with:
$ docker pull digiampietro/gns3-large
in both cases you need Docker already installed on your Linux system.
Networking GNS3 and container
A docker container has a virtual interface, eth0, with an ip assigned to it randomly chosen by docker from the network 172.17.0.0/16, this interface is “piped” to a corresponding interface on the host with a name similar to vethb1ed276; on the host this interface, together with similar interfaces of other docking containers, are bridged together on the docker0 bridge, that has the ip address 172.17.42.1/16.
This configuration allows each container to talk to the host and to the other containers. To allow networking to the outside world docker does two things:
- on the container it adds a default route to the host ip address of 172.17.42.1
- on the host it adds a NAT rule to iptables:
# You can see that the Docker server creates a
# masquerade rule that let containers connect
# to IP addresses in the outside world:

$ sudo iptables -t nat -L -n
...
Chain POSTROUTING (policy ACCEPT)
target     prot opt source               destination
MASQUERADE  all  --  172.17.0.0/16       !172.17.0.0/16
...
More details on Docker Network Configuration on the docker site.
In our case I want to be able to reach the outside world from inside the emulated GNS3 network, but I also want to be able to reach the emulated network from the outside world, especially from the host: I want, for example, be able to use my browser and ASDM Launcher to configure the emulated Cisco ASA device. For this reason I don’t want that the emulated network is NATted.
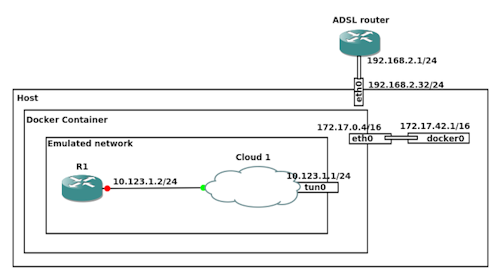
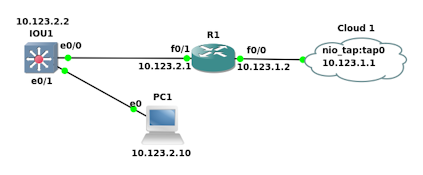
To connect the emulated network to the outside world GNS3 provides the Cloud symbol: on one side it has a standard interface that you can connect to a router, on the other side it can be attached to a physical device like eth0; but to attach it to eth0 gns3 must be run as root; I don’t want to run gns3 as root (mainly because of file access rights and ownership issues), for this reason I created a tap0 interface, inside the container, owned by the user running gns3. The picture below shows the network diagram:

Starting the docker container
The docker container is normally started using the script myrun.sh, that can be personalized to change settings, available on the gns3-large github repository.
To simplify sharing of data between the Docker container and the host what happens is:
- during the startup of the docker container a user, with same username and userid of current user, is added to the container, but with the password of docker. This allows easy sharing of files
- with the
-voption the entire current user’s home directory is “mounted” inside the container, this allows to run gns3 with full access to user’s home directory without any issues related to file access rights and file ownership
The myrun.sh uses many environment variables that can be personalized, this script is included here:
#!/bin/sh

export GDISPLAY=unix/$DISPLAY      # forward X11 display to the host machine
export GUSERNAME=`id -u -n`        # current user's username
export GUID=`id -u`                # current user's user id
export GGROUP=`id -g -n`           # current user's primary group name
export GGID=`id -g`                # current user's primary group id
export GHOME=$HOME                 # current user's home directory
export GSHELL=$SHELL               # current user's shell
#
# to connect the emulated network to the external world
# we use a tap0 interface inside the docker container
# connected to the GNS3 emulated network through
# a GNS3 Cloud device attached to the tap0 interface
#
export GTAPIP=10.123.1.1           # the tap0 IP address
export GTAPMASK=255.255.255.0      # the tap0 IP netmask
export GTAPNATENABLE=0             # enable NAT on tap0 outgoing traffic
                                   # (if 1 GROUTE2GNS3 must be 0)
export GNS3NETWORK=10.123.0.0      # IP network used inside the GNS3 emulated
                                   # network
export GNS3NETMASK=255.255.0.0     # IP netmask used inside the GNS3 emulated
                                   # network
export GROUTE2GNS3=1               # enable routing from the container eth0 to
                                   # the emulated network

sudo docker run -h gns3-large                     \
                -v /tmp/.X11-unix:/tmp/.X11-unix  \
                -v $HOME:$HOME                    \
                -e DISPLAY=$GDISPLAY              \
                -e GUSERNAME=$GUSERNAME           \
                -e GUID=$GUID                     \
                -e GGROUP=$GGROUP                 \
                -e GGID=$GGID                     \
                -e GHOME=$HOME                    \
                -e GSHELL=$SHELL                  \
                -e GTAPIP=$GTAPIP                 \
                -e GTAPMASK=$GTAPMASK             \
                -e GTAPNATENABLE=$GTAPNATENABLE   \
                -e GNS3NETWORK=$GNS3NETWORK       \
                -e GNS3NETMASK=$GNS3NETMASK       \
                -e GROUTE2GNS3=$GROUTE2GNS3       \
                --privileged                      \
                -it digiampietro/gns3-large
This script runs the digiampietro/gns3-large container, the important things to note are:
- the folder
/tmp/.X11-unixis “mounted” from the host to the container (option -v) and, together with the environment variableDISPLAYset tounix/$DISPLAY, allows the container to display windows in the host display; - the entire user’s home directory (environment variable
HOME) is mounted on the container at the same position (option -v); - the following environment variables are passed from the host to the container, they will be used by the
startup.shscript that will be the script executed at startup by the container:GUSERNAME, GUID, GGROUP, GGID, GHOME, GSHELLthey contain the current user’s username, user id, primary group name, primary group id, home directory and shell; they will be used by thestartup.shscript to create a user in the container that is a replica of current user in the host system;GTAPIP, GTAPMASKcontains IP address and netmask of the container’stap0interface, by default this address is10.123.1.1with netmask255.255.255.0as shown in the network diagram above;GTAPNATENABLEif set to1this variable tells the startup script to enable NAT on theeth0interface, in this way, without any other setup, the emulated network will be able to reach the external world and the internet; but the external world, and the host system, will not be able to reach the emulated network because it will be behind a NAT (see the above network diagram); If this variable is set,GROUTE2GNS3must be unset;GNS3NETWORK, GNS3NETMASKthey contain the network address and netmask that will be used in the emulated network, by default these values are10.123.0.0and255.255.0.0. This information will be used by thestartup.shscript only ifGTAPNATENABLEis0andGROUTE2GNS3is1.GROUTE2GNS3if set to1tells thestartup.shscript to setup a route to the emulated network; in this way the emulated network will not be “natted” and can reach and be reached by the host and by the external world, but routes must be added on the host and, with reference to the above network diagram, on the ADSL router. Adding the route on the host is easy, justo do asudo ./hostroute2gns3(thehostroute2gns3is available on the gns3-large git repository); You have to add a route for the network$GNS3NETWORK/$GNS3NETMASKon the ADSL router also, giving it, as default gateway, the IP address of the linux host (the linux host must have an IP fixed address or a DHCP reservation that gives it always the same IP address);
--privilegedoption allows the container to run with root privileges, this is needed to create thetap0device;-it digiampietro/gns3-largestarts the named container with a controlling terminal;
After executing the myrun.sh the gns3-large container is started and it executes the startup.sh script, as specified in the Dockerfile:
#!/bin/sh
#
# add current user and user's primary group
#
groupadd -g $GGID $GGROUP
useradd -u $GUID -s $GSHELL -c $GUSERNAME -g $GGID -M -d $GHOME $GUSERNAME
usermod -a -G sudo $GUSERNAME
echo $GUSERNAME:docker | chpasswd
#
# generate IOU License
#
if [ -e $GHOME/gns3-misc/keygen.py ]
then
    cp $GHOME/gns3-misc/keygen.py /src/misc/
    cd /src/misc
    ./keygen.py  | egrep "license|`hostname`" > iourc.txt
else
    echo "IOU License File generator keygen.py not found"
    echo "please put keygen.py in"
    echo "$GHOME/gns3-misc/keygen.py"
fi
#
# create the tap device owned by current user
# assign it an IP address, enable IP routing and NAT
#
echo "-------------------------------------------------------------------"
echo "tap0 has address $GTAPIP netmask $GTAPMASK"
echo "if yuou use the cloud symbol to connect to the physical network"
echo "use an address on the same subnet, and, on the cloud symbol,"
echo "select the  \"NIO TAP\" tab and add the \"tap0\" device"
echo "-------------------------------------------------------------------"
tunctl -u $GUSERNAME
ifconfig tap0 $GTAPIP netmask $GTAPMASK up
echo 1 > /proc/sys/net/ipv4/ip_forward
if [ "$GTAPNATENABLE" = "1" ]
then
    echo "--- Enabling NAT on incoming ip on tap0 device"
    iptables -t nat -A POSTROUTING -o eth0 -j MASQUERADE
    iptables -A FORWARD -i tap0 -j ACCEPT
    iptables -A INPUT -i tap0 -j ACCEPT
fi
if [ "$GROUTE2GNS3" = "1" ]
then
    route add -net $GNS3NETWORK netmask $GNS3NETMASK gw $GTAPIP
fi
#
# become the current user and start a shell
su -l $GUSERNAME
#
# another root shell
/bin/bash
It should be easy to understand what this script does:
- “clone” the current user, including his primary group, in the container using environment variables passed by docker from the host to the container (the multiple -e options used in the
myrun.shscript); - assign the password
dockerto the current user’s username inside the container (needed if you want to execute esudoinside the container); - generate the IOU license file in
/src/misc/iourc.lic, but to do so you have to put thekeygen.pyfile in the folder$HOME/gns3-misc, otherwise no IOU license is generated and you will not be able to use IOU. For legal reasons this file cannot be included in the container image. The license file must be generated each time the container starts because, each time, it can have a different MAC address and the license is impacted by the MAC address; - create the
tap0interface owned by the current user; in this way it is possible to run gns3 as a normal user and connect the cloud symbol to this interface without being root; - enable routing on the container
- if
GTAPNATENABLEis1useiptablesto configure NAT on theeth0interface; - if
GROUTE2GNS3is1, instead, add a route to the gns3 emulated network on the container - start a shell as the user’s username
- when the above shell teminate, runs another shell as root. In this way it is possibile to become root after exiting from the normal user shell; exiting from this root shell will stop the container.
When the startup.sh has started the user’s shell you are greeted by a standard prompt and you can see that the hostname is not your usual hostname but the name you gave to the container with the -h option, gns3-large in our case:
valerio@ubuntu-hp:~/docker/gns3-large$ ./myrun.sh
[sudo] password for valerio:
-------------------------------------------------------------------
tap0 has address 10.123.1.1 netmask 255.255.255.0
if yuou use the cloud symbol to connect to the physical network
use an address on the same subnet, and, on the cloud symbol,
select the  "NIO TAP" tab and add the "tap0" device
-------------------------------------------------------------------
Set 'tap0' persistent and owned by uid 1000
valerio@gns3-large:~$ hostname
gns3-large
valerio@gns3-large:~$
Configuring GNS3
To use IOU a license file generator is needed, it is usually called keygen.py and must be put in the folder gns3-misc under your home directory as shown below (the container will check this file location, please note that “valerio” is my username, you have to replace “valerio” with your username):
valerio@ubuntu-hp:~$ ls ~/gns3-misc/keygen.py
/home/valerio/gns3-misc/keygen.py
For legal reasons this file cannot be included in the container image, but can be searched on Google whth a search string similar to “Cisco IOU License Generator v2“. (I don’t know if searching and downloading is legal or not, please check with your lawyer). After launching gns3 from the command line we have to configure gns3:
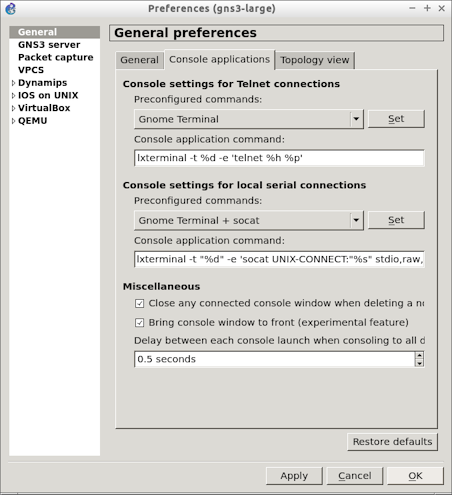
- go to Edit -> Preferences -> General click Console applications tab and replace the string gnome-terminal with the string lxterminal and then click OK; this is needed because in the docker container gnome-terminal has some problems related to its use of the dbus system:
- go to Edit -> Preferences -> IOS on UNIX:
- in the Path to IOURC put the string
/src/misc/iourc.txt - in the Path to iouyap put the string
/usr/local/bin/iouyap; iouyap is a program that converts the encapsulated ethernet frame of IOU to an UDP encapsulated ethernet format used by GNS3
Press Apply and Ok
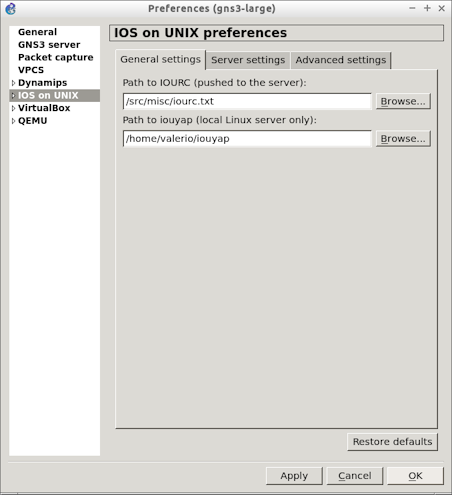
- in the Path to IOURC put the string
- now we load the IOU images into gns3; for legal reasons these files cannot be included in the container image, but, again, check with your lawyer, and search them on Google. There are a lot of IOU images floating on the Internet, but only few of them run smoothly in GNS3; some have problems with some features (like CDP), some others are unusable because they create loops in redundant configurations as if the STP protocol doesn’t work; on the gns3 forum there are interesting discussions about what are the best images to run in GNS3. Some of the reccomendations are:
- i86bi_linux_l2-adventerprise-ms.nov11-2013-team_track.bin i am using this one, for layer 2 IOU, it works flawlessly for me and I strongly recommend to use this one
- i86bi_linux_l2-ipbasek9-ms.jan24-2013-B (15.1) a user says that it supports many L2 features. And looks so stable
- another user says: i86bi-linux-l2-ipbasek9-15.1e.bin for Switches and i86bi-linux-l3-adventerprisek9-15.4.1T.bin for Routers. These seem to be the 2 most stable images I’ve found
- and another user: I use i86bi-linux-l2-adventerprise-15.1b.bin for Switches and i86bi-linux-l3-adventerprisek9-15.4.2T.bin for Routers. For me they work stable.
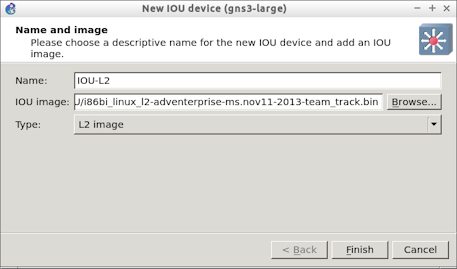
- go to Edit -> Preferences -> IOS on UNIX, click the small arrow and then on IOU Devices -> New
- in the Name field I entered IOU-L2
- in the IOU image browse to select the i86bi_linux_l2-adventerprise-ms.nov11-2013-team_track.bin file that you ave downloaded somewhere
- in Type select L2 image and then click Finish
- you can click Edit -> Network and adjust the number of Ethernet adapters (each one has 4 ports) and the number of Serial adapters, i prefer 0 Serial adapters, because usually switches don’t have serial interfaces:
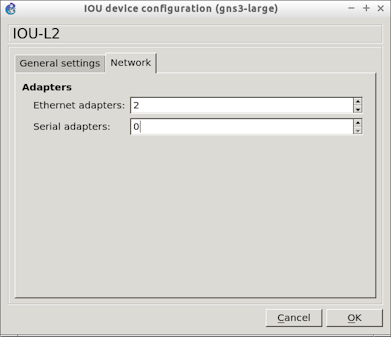
click Ok
- now it’s time to load a Cisco router image; not every cisco router is emulated by Dynamips (the Cisco emulator engine used by GNS3), not every expansion card is emulated and there are some firmware working better than others in GNS3; for this reason it is importat to follow community recommendation for the best Cisco model and firmware image; some of the recommendations I found are:
- c3725-advipservicesk9-mz.124-23.bin is what you want. This is pretty much the best image to use with GNS3. This i what I am using and strongly recommend
- c3640-jk9s-mz.124-16.bin it works with all gns3vault labs so it’s pretty handy
- c3725-adventerprisek9-mz.124-15.T10.bin a user says: I use this for other labs as I found the above IOS was lacking a few features, one being EIGRP for IPv6
- c2691-adventerprisek9-mz.124-25c.bin another user says: seems to be working well for me so far. But some test labs I am doing are CBT Nugget test labs so that helps with those since that is what he uses
- to add a cisco router and image go to Edit -> Preferences -> Dynamips, click the small arrow and then on IOS Routers -> New browse to select the image
c3725-advipservicesk9-mz.124-23.binyou have downloaded, answer Yes if asked to decompress this IOS image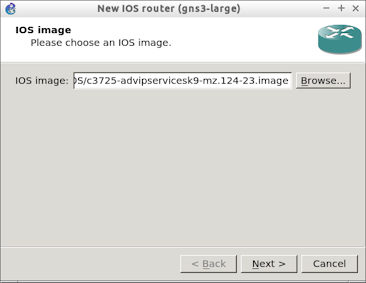
- click Next
- accept c3725 as Name and Platform and click Next
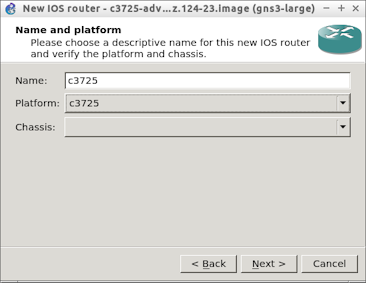
- accept the default RAM of 128 MiB and click Next
- as Network adapters accept, on slot 0, the GT96100-FE that support 2 Fast Ethernet interfaces and puth the NM-4T on slot 1, that support four serial interfaces
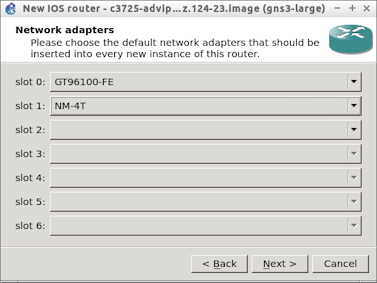
- click Next, don’t select any WIC modules, click Next again, a window, asking you an Idle-PC value, will pop-up; ignore for the moment and click Finish. We will find the Idle-PC value later; this value is very important, because when Dynamips emulate the Cisco router, it emulates everything, including the main loop in firmware, when the Cisco router is sitting idle, waiting for some event to happen. The idle-PC (PC is Program Counter) is the memory address of an instruction in the main loop, when this value is known by gns3/dynamips it will be used to pause few milliseconds the emulated device and this allows a dramatic reduction of dynamips cpu cycles (cpu load goes down from 100% to about 2-3%)
- you can input more IOU and router images or QEMU Virtual Machine images
- the other options regarding Packet Capture (Wireshark) and VPCS have good default values


A simple GNS3 network
We are ready, now, to design our first network in gns3.
We put the cloud symbol in the design area, add the tap0 interface to it clicking on the NIO TAP tab, entering tap0 in the TAP interface and then clicking on Add, Apply and OK
.
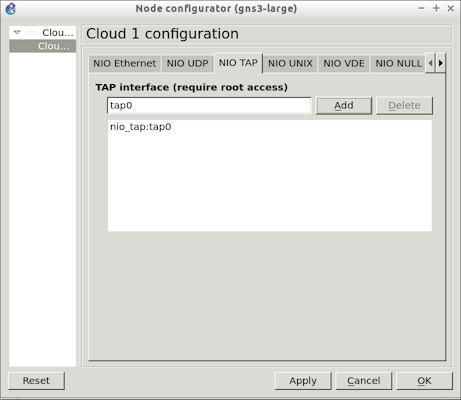
The cloud symbol is needed to connect our emulated network to the outside world through the tap0 network interface. Because tap0 is owned by the current user, we don’t need to run gns3 as root to use the tap0 device.


Now we add the router R1 (the C3725 configured above) the switch IOU1 (the iou switch configured above) and PC1 (the virtual PC emulator).
We start all devices clicking on Device -> Start, after clicking our cpu load goes very high due to the dynamips process emulating the Cisco router:
top - 20:14:35 up 43 min,  3 users,  load average: 0,91, 0,57, 0,66
Tasks: 249 total,   1 running, 247 sleeping,   0 stopped,   1 zombie
%Cpu(s): 28,5 us,  1,2 sy,  0,0 ni, 62,8 id,  7,5 wa,  0,0 hi,  0,0 si,  0,0 st
KiB Mem:   8087792 total,  5195076 used,  2892716 free,  1022404 buffers
KiB Swap: 15625212 total,        0 used, 15625212 free.  1872536 cached Mem

  PID USER      PR  NI    VIRT    RES    SHR S  %CPU %MEM     TIME+ COMMAND
11825 valerio   20   0  687352 271956 197856 S 100,2  3,4   1:10.44 dynamips
 3795 valerio   20   0  961412 164292  60748 S   6,0  2,0   4:45.77 chrome
 3835 valerio   20   0  846360 300028  86848 S   4,3  3,7   3:05.39 chrome
 1290 root      20   0  267208  32696  21412 S   1,7  0,4   1:26.23 Xorg
15889 valerio   20   0  167124   2224    216 S   1,7  0,0   0:00.89 vpcs
 6147 valerio   20   0  840308 144296  36804 S   1,3  1,8   0:38.35 chrome
 8359 valerio   20   0  365028  25352   5900 S   0,7  0,3   0:28.85 gns3server
15892 valerio   20   0  268056 109336  58444 S   0,7  1,4   0:01.41 i86bi_linu+
To lower the cpu usage right click the router R1 and Idle-PC, accept the proposed value, click Apply and check again the cpu load; you can try different values of Idle-PC to find the one with the lower cpu usage; usually the default value is ok and dramatically reduce cpu load as shown below where the dynamips process has moved from 100% cpu usage to only 2.7%
top - 20:19:57 up 48 min,  3 users,  load average: 0,60, 0,85, 0,77
Tasks: 247 total,   2 running, 244 sleeping,   0 stopped,   1 zombie
%Cpu(s):  7,9 us,  3,6 sy,  0,0 ni, 84,9 id,  3,6 wa,  0,0 hi,  0,0 si,  0,0 st
KiB Mem:   8087792 total,  5195472 used,  2892320 free,  1023576 buffers
KiB Swap: 15625212 total,        0 used, 15625212 free.  1878992 cached Mem

  PID USER      PR  NI    VIRT    RES    SHR S  %CPU %MEM     TIME+ COMMAND
 3795 valerio   20   0  961412 164768  60704 S  15,6  2,0   5:10.26 chrome
 3835 valerio   20   0  852312 301748  92740 S  11,3  3,7   3:21.95 chrome
15889 valerio   20   0  167124   2224    216 S   4,3  0,0   0:06.05 vpcs
 1290 root      20   0  269324  33896  22020 S   4,0  0,4   1:33.18 Xorg
 8359 valerio   20   0  365028  25352   5900 R   2,7  0,3   0:32.63 gns3server
11825 valerio   20   0  687352 275272 197920 S   2,7  3,4   4:57.72 dynamips
 6147 valerio   20   0  844716 135360  37340 S   2,3  1,7   0:45.85 chrome
15892 valerio   20   0  268056 109336  58444 S   1,3  1,4   0:03.66 i86bi_linu+
The tap0 interface has address 10.123.1.1/24 (because of myrun.sh environment variables), so we connect to the R1 router console and:
- configure the IP 10.123.1.2/24 on his f0/0 interface (outside interface)
- configure the IP 10.123.2.1/24 on his f0/1 interface (inside interface)
- configure 10.123.1.1 as the defautl gateway
R1#conf t
Enter configuration commands, one per line.  End with CNTL/Z.
R1(config)#interface fastethernet 0/0
R1(config-if)#ip address 10.123.1.2 255.255.255.0
R1(config-if)#no shutdown
R1(config-if)#exit
*Mar  1 00:25:01.075: %LINK-3-UPDOWN: Interface FastEthernet0/0, changed state
to up
*Mar  1 00:25:02.075: %LINEPROTO-5-UPDOWN: Line protocol on Interface FastEthe
rnet0/0, changed state to up
R1(config)#ip route 0.0.0.0 0.0.0.0 10.123.1.1
R1(config)#interface fastEthernet 0/1
R1(config-if)#no shutdown
R1(config-if)#ip address 10.123.2.1 255.255.255.0
R1(config-if)#exit
R1(config)#exit
R1#
*Mar  1 00:27:52.823: %SYS-5-CONFIG_I: Configured from console by console
R1#write mem
Building configuration...
[OK]
R1#
to configure IOU1:
- explicitly configure the ports in access mode
- explicitly assign the predefined Vlan 1 to each port
- put in no shutdown his interfaces
- assign the IP address 10.123.2.2 to the switch’s Vlan 1 interface
IOU1#conf t
Enter configuration commands, one per line.  End with CNTL/Z.
IOU1(config)#interface range ethernet 0/0 - 3
IOU1(config-if-range)#switchport mode access
IOU1(config-if-range)#switchport access vlan 1
IOU1(config-if-range)#no shutdown
IOU1(config-if-range)#exit
IOU1(config)#
*Nov 14 20:18:16.505: %LINK-3-UPDOWN: Interface Ethernet0/0, changed state to up
*Nov 14 20:18:16.505: %LINK-3-UPDOWN: Interface Ethernet0/1, changed state to up
*Nov 14 20:18:16.505: %LINK-3-UPDOWN: Interface Ethernet0/2, changed state to up
*Nov 14 20:18:16.505: %LINK-3-UPDOWN: Interface Ethernet0/3, changed state to up
*Nov 14 20:18:17.510: %LINEPROTO-5-UPDOWN: Line protocol on Interface Ethernet0/
0, changed state to up
*Nov 14 20:18:17.510: %LINEPROTO-5-UPDOWN: Line protocol on Interface Ethernet0/
1, changed state to up
*Nov 14 20:18:17.510: %LINEPROTO-5-UPDOWN: Line protocol on Interface Ethernet0/
2, changed state to up
*Nov 14 20:18:17.510: %LINEPROTO-5-UPDOWN: Line protocol on Interface Ethernet0/
3, changed state to up
IOU1(config)#interface range ethernet 1/0 - 3
IOU1(config-if-range)#switchport mode access
IOU1(config-if-range)#switchport access vlan 1
IOU1(config-if-range)#no shutdown
IOU1(config-if-range)#exit
IOU1(config)#
*Nov 14 20:20:15.711: %LINK-3-UPDOWN: Interface Ethernet1/0, changed state to up
*Nov 14 20:20:15.711: %LINK-3-UPDOWN: Interface Ethernet1/1, changed state to up
*Nov 14 20:20:15.711: %LINK-3-UPDOWN: Interface Ethernet1/2, changed state to up
*Nov 14 20:20:15.711: %LINK-3-UPDOWN: Interface Ethernet1/3, changed state to up
*Nov 14 20:20:16.718: %LINEPROTO-5-UPDOWN: Line protocol on Interface Ethernet1/
0, changed state to up
*Nov 14 20:20:16.718: %LINEPROTO-5-UPDOWN: Line protocol on Interface Ethernet1/
1, changed state to up
*Nov 14 20:20:16.718: %LINEPROTO-5-UPDOWN: Line protocol on Interface Ethernet1/
2, changed state to up
*Nov 14 20:20:16.718: %LINEPROTO-5-UPDOWN: Line protocol on Interface Ethernet1/
3, changed state to up
IOU1(config)#interface vlan 1
IOU1(config-if)#ip address 10.123.2.2 255.255.255.0
IOU1(config-if)#no shutdown
IOU1(config-if)#
*Nov 14 20:21:41.875: %LINK-3-UPDOWN: Interface Vlan1, changed state to up
*Nov 14 20:21:42.877: %LINEPROTO-5-UPDOWN: Line protocol on Interface Vlan1, cha
nged state to up
IOU1(config-if)#exit
IOU1(config)#exit
IOU1#
*Nov 14 20:21:50.943: %SYS-5-CONFIG_I: Configured from console by console
IOU1#write mem
Building configuration...
Compressed configuration from 1421 bytes to 890 bytes[OK]
IOU1#
to configure PC1
- assign it the IP 10.123.2.10/24 and gateway 10.123.2.1
PC1> ip 10.123.2.10/24 10.123.2.1
Checking for duplicate address...
PC1 : 10.123.2.10 255.255.255.0 gateway 10.123.2.1

PC1> save
.  done

PC1>
Now we can try to ping various ip addresses from each device, for example from PC1:
- we can ping 10.123.2.2 (IOU1 switch)
- we can ping 10.123.2.1 (R1 router, inside interface)
- we can ping 10.123.1.2 (R1 router, outside interface)
- we can ping 10.123.1.1 (tun0 interface)
- we can ping 172.17.0.2 (the docker image eth0 IP address)
- we cannot ping 172.17.42.1 (the host docker0 IP address)
PC1> ping 10.123.2.2 -c 2
10.123.2.2 icmp_seq=1 ttl=255 time=0.604 ms
10.123.2.2 icmp_seq=2 ttl=255 time=0.559 ms

PC1> ping 10.123.2.1 -c 2
10.123.2.1 icmp_seq=1 ttl=255 time=6.968 ms
10.123.2.1 icmp_seq=2 ttl=255 time=5.947 ms

PC1> ping 10.123.1.2 -c 2
10.123.1.2 icmp_seq=1 ttl=255 time=4.472 ms
10.123.1.2 icmp_seq=2 ttl=255 time=6.667 ms

PC1> ping 10.123.1.1 -c 2
10.123.1.1 icmp_seq=1 ttl=63 time=22.386 ms
10.123.1.1 icmp_seq=2 ttl=63 time=16.871 ms

PC1> ping 172.17.0.2
172.17.0.2 icmp_seq=1 ttl=63 time=15.985 ms
172.17.0.2 icmp_seq=2 ttl=63 time=17.817 ms

PC1> ping 172.17.42.1 -c 2
172.17.42.1 icmp_seq=1 timeout
172.17.42.1 icmp_seq=2 timeout
We cannot ping the docker0 host interface (the other end of the “pipe” attached to tap0) because our gns3 network and our docker image know where to send packets to the external world, but the host doesn’t know where to send packets to the network 10.123.0.0/16, so we need to execute the script hostroute2gns3 that adds the needed route:
valerio@ubuntu-hp:~/docker/gns3-large$ sudo ./hostroute2gns3
Container ID: 2d7205472e80
Container IP: 172.17.0.2
removing existing route
adding route
valerio@ubuntu-hp:~/docker/gns3-large$ netstat -nr
Kernel IP routing table
Destination     Gateway         Genmask         Flags   MSS Window  irtt Iface
0.0.0.0         192.168.2.1     0.0.0.0         UG        0 0          0 eth0
10.123.0.0      172.17.0.2      255.255.0.0     UG        0 0          0 docker0
172.17.0.0      0.0.0.0         255.255.0.0     U         0 0          0 docker0
192.168.2.0     0.0.0.0         255.255.255.0   U         0 0          0 eth0
To connect our emulated network to the Internet we need also to put a route on our ADSL router to reach the 10.123.0.0/16 network using as gateway the IP address of our host (192.168.2.32 in this case).
Having done this we can now:
- ping 172.17.42.1 (our host, docker0 interface)
- ping 192.168.2.32 (our host, eth0 interface)
- ping 192.168.2.1 (our ADSL router)
- ping 8.8.8.8 (on the Internet, Google’s public DNS server)
PC1> ping 172.17.42.1 -c 2
172.17.42.1 icmp_seq=1 ttl=62 time=19.906 ms
172.17.42.1 icmp_seq=2 ttl=62 time=15.904 ms

PC1> ping 192.168.2.32 -c 2
192.168.2.32 icmp_seq=1 ttl=62 time=11.028 ms
192.168.2.32 icmp_seq=2 ttl=62 time=15.963 ms

PC1> ping 192.168.2.1 -c 2
192.168.2.1 icmp_seq=1 ttl=61 time=17.163 ms
192.168.2.1 icmp_seq=2 ttl=61 time=15.727 ms

PC1> ping 8.8.8.8 -c 2
8.8.8.8 icmp_seq=1 ttl=44 time=43.010 ms
8.8.8.8 icmp_seq=2 ttl=44 time=46.294 ms

PC1>
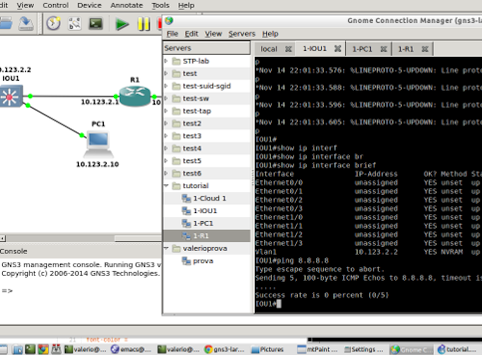
Using Gnome Connection Manager
The easy access to each device console in GNS3 is really handy, but if you have many devices it would be easier to have a tabbed terminal emulator with a tab for each device.
Gnome Connection Manager (gcm) has exactly this feature, but cannot be used directly from GNS3, for this reason I wrote a small perl script, gcmconf that reads the GNS3 project files and create, or update, the Gnome Connection Manager configuration file so it will be ultra easy to access all the consoles of our gns3 projects. For example:
valerio@gns3-large:~$ gcmconf
opening: /home/valerio/.gcm/gcm.conf
---- processing /home/valerio/GNS3/projects/tutorial/tutorial.gns3
Writing the new /home/valerio/.gcm/gcm.conf file
valerio@gns3-large:~$ gcm &
[1] 146
valerio@gns3-large:~$ gns3

iouyap problems
I don’t know if I misundertood something but I had problems with ioyap :
[E 150204 09:44:06 iou_device:435] error while adding an UDP NIO for IOU1: /usr/local/bin/iouyap has no privileged access to tap0.
that I solved setting setuid bit to iouyap:
chmod +s /usr/local/bin/iouyap
Hope it helps
PD: The captcha is too difficult to read
X Display
I’m a little hazy on what is needed for X forwarding from the container to the host system. Here it seems you just mount /tmp/.x11-unix and pass it as unix/:0.
However, I’ve read other places that you need to mount .Xauthority from the user (which might be already accomplished above by the mounting of $HOME, I guess), or that you can forward the DISPLAY env just be -e DISPLAY, which would give you :0 vs unix/:0.
Either way, none of the above options seems to work – it can’t contact the host’s X server. Any suggestions? Most of the older docker solutions suggest standing up an ssh solution inside the container and X forwarding, which is probably clunky.
X Display Forwarding Issues
I’m a little hazy on what is needed for X forwarding from the container to the host system. Here it seems you just mount /tmp/.x11-unix and pass it as unix/:0.
However, I’ve read other places that you need to mount .Xauthority from the user (which might be already accomplished above by the mounting of $HOME, I guess), or that you can forward the DISPLAY env just be -e DISPLAY, which would give you :0 vs unix/:0.
Either way, none of the above options seems to work – it can’t contact the host’s X server. Any suggestions? Most of the older docker solutions suggest standing up an ssh solution inside the container and X forwarding, which is probably clunky.
Issues when trying to update docker image
Hello Valerio,
I have been using your docker image gns3-large in my SL linux for a while and now would like to commit a new release from the ones you have posted. However, I’m having an issue with ca-certificates. I hope you can help me with it:
This is my host and docker version:
Linux xxxx2.6.32-504.3.3.el6.x86_64 #1 SMP Tue Dec 16 14:29:22 CST 2014 x86_64 x86_64 x86_64 GNU/Linux
docker version
Client version: 1.3.1
Client API version: 1.15
Go version (client): go1.3.3
Git commit (client): c78088f/1.3.1
OS/Arch (client): linux/amd64
Server version: 1.3.1
Server API version: 1.15
Go version (server): go1.3.3
Git commit (server): c78088f/1.3.1
Docker was eating all my disk as, I don’t know way, multiple instances of the same container were stored (it looked like every time I run it, a new instance was stored?).
I decided to delete all of them but the last one with:
docker ps -a | grep ‘weeks ago’ | awk ‘{print $1}’ | xargs –no-run-if-empty docker rm
Now I want to delete a new iteration of your image by modifying the Dockerfile and running mybuild.sh and I get the following error:
2015/02/06 10:04:41 Get https://index.docker.io/v1/repositories/library/ubuntu/images: x509: failed to load system roots and no roots provided
No much literature abut this. Blogs say is to do with the ca-certificates. I reinstalled the ca-certificates in the hist and tried to mount them again in the image with:
docker run -v /etc/pki/tls/certs:/etc/ssl/certs -d 703cf9d783c6 “update-ca-certificates”
But the problem is still there.
I also tried to installed the base image (your 1st iteration of the image) but get the same error.
Do you have another docker that can run the latest GNS3?
Hi,
I would like to know if you have created another docker container that can run the latest GNS3 v1.3.1?
Also I am still trying to learn linux, would you happen to have a step by step procedure on how to run the docker with explanations?
Thanks again and looking forward in trying this!
I can’t seem to make the docker package work on 14.04.2 dekstop
please help